Anime Maker logoAnime Maker
  • Home
  • AI Anime Generator
  • Features
  • Cases
  • Pricing
  • Blog
Anime Maker logoAnime Maker

Create anime images, original characters, photo-based illustrations, and short videos from focused prompts.

Email
Product
  • Features
  • Pricing
  • FAQ
  • AI Anime Generator
  • Photo to Anime AI
  • Image to Video Anime AI
  • Anime Character Generator
  • Anime Logo Maker
Company
  • About
  • Contact
Legal
  • Cookie Policy
  • Privacy Policy
  • Terms of Service
© 2026 Anime Maker All Rights Reserved.

Anime camera angle control

Anime Camera Angle Control from a Reference Image

Upload one authorized reference image, describe the viewpoint you want to test, and create a square reinterpretation for comparing eye-level, low-angle, high-angle, overhead, and three-quarter compositions.

Upload the frame before directing a new viewpoint

The real task begins here: sign in, upload one JPG, PNG, or WebP reference, name the target camera height and direction, restate the visible identity anchors, and submit the reference-image edit. The page requires working upload storage and APIMart reference-image configuration.

Upload reference image

Sign in before choosing a file. Your prompt will be restored when you return.

Generation mode
Output format
One image
1024 × 1024
Flattened raster reinterpretation

Example outputs

What one focused input can produce

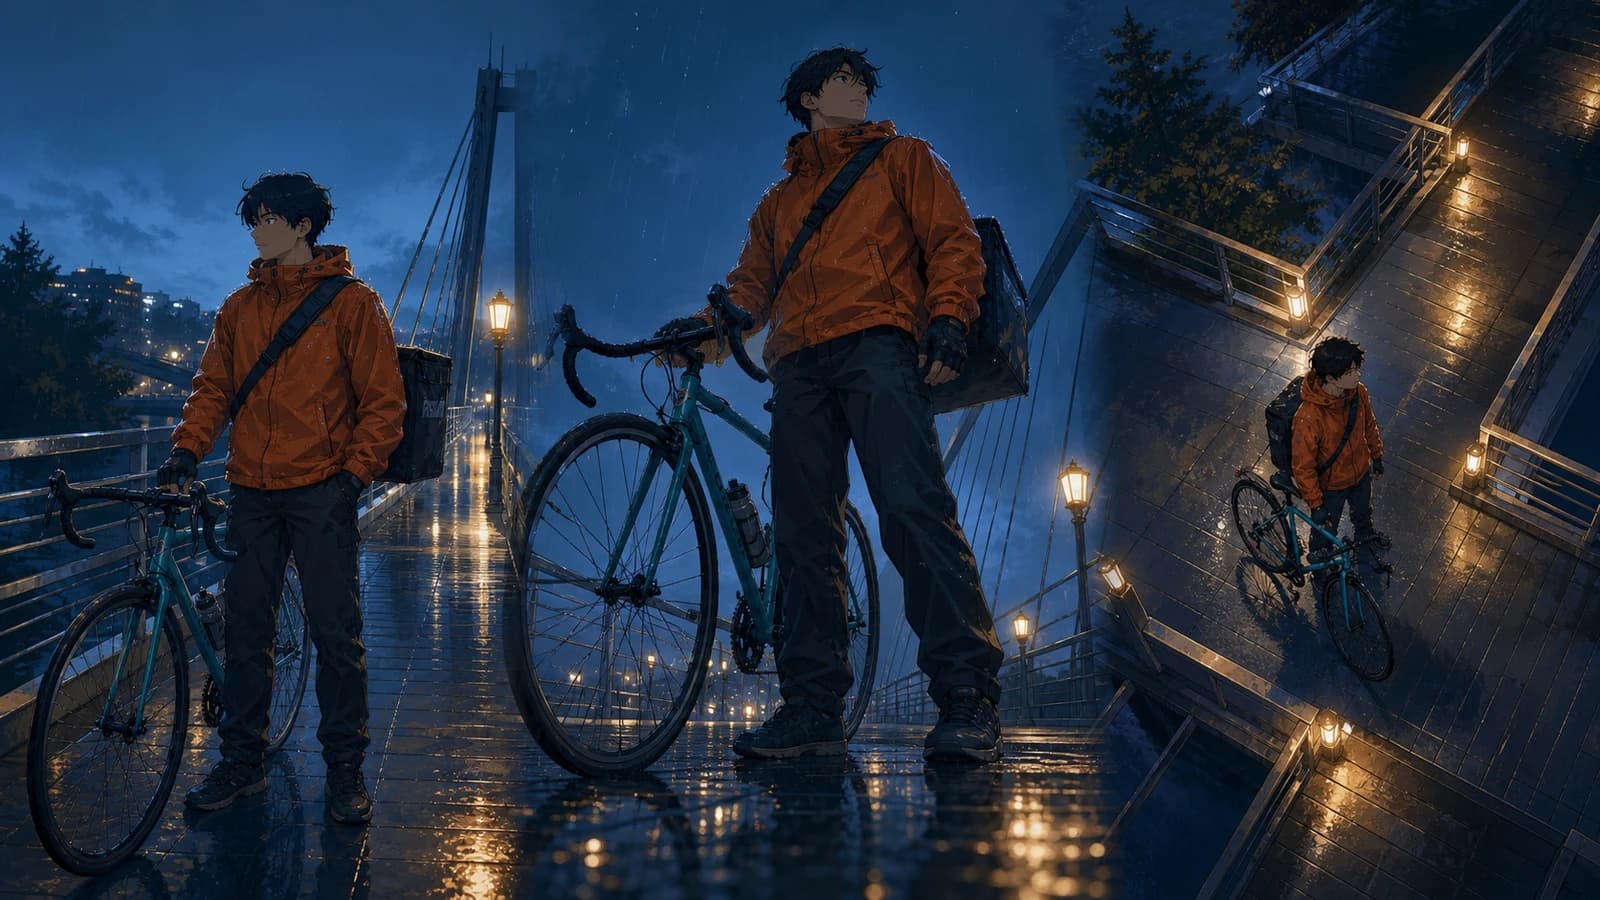
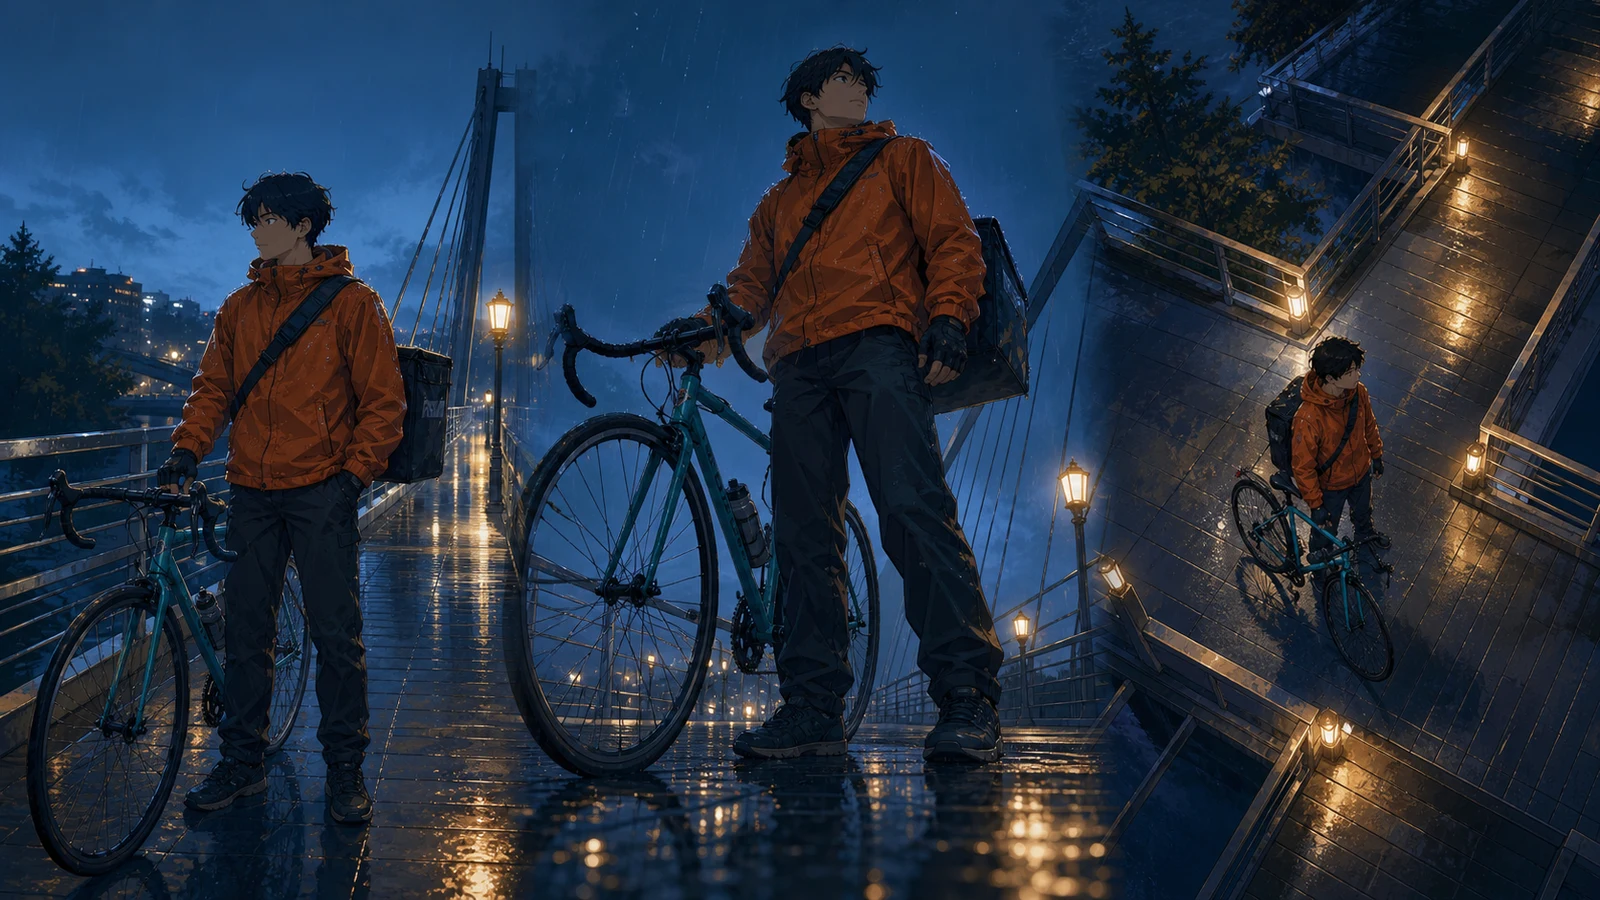
Original anime bicycle courier on a rainy bridge shown at eye level, from a low angle, and from overhead

Standard image

Advanced image

Actual output

one newly generated 1024 × 1024 flattened raster reinterpretation from the reference and prompt

Best used for

shot exploration, storyboard alternatives, character keyframe studies, composition reviews, pitch frames, and early visual development

Not designed for

deterministic 3D camera rotation, exact identity or pose locking, exact lens simulation, automatic multi-view sheets, seeds, layers, batch processing, or video

Workflow and guidance reviewed 2026-07-22

Capability copy was checked against the current required-reference validation, JPG/PNG/WebP upload flow, configured APIMart image-edit task, and 1024 × 1024 flattened result path. Camera guidance was cross-checked against Google Cloud, Adobe, Nikon, Blender, and W3C first-party documentation.

Change one camera decision, then compare the geometrySix steps from reference to angle reviewCamera-angle prompts with review criteriaA field guide to viewpoint, perspective, and continuityReview the reinterpretation, not an imaginary camera moveQuestions about anime camera angle control

Change one camera decision, then compare the geometry

Separate camera height, horizontal direction, shot size, subject distance, and frame position. A controlled brief makes it easier to tell whether a weak result came from the requested angle, the source image, or an unrelated redesign.

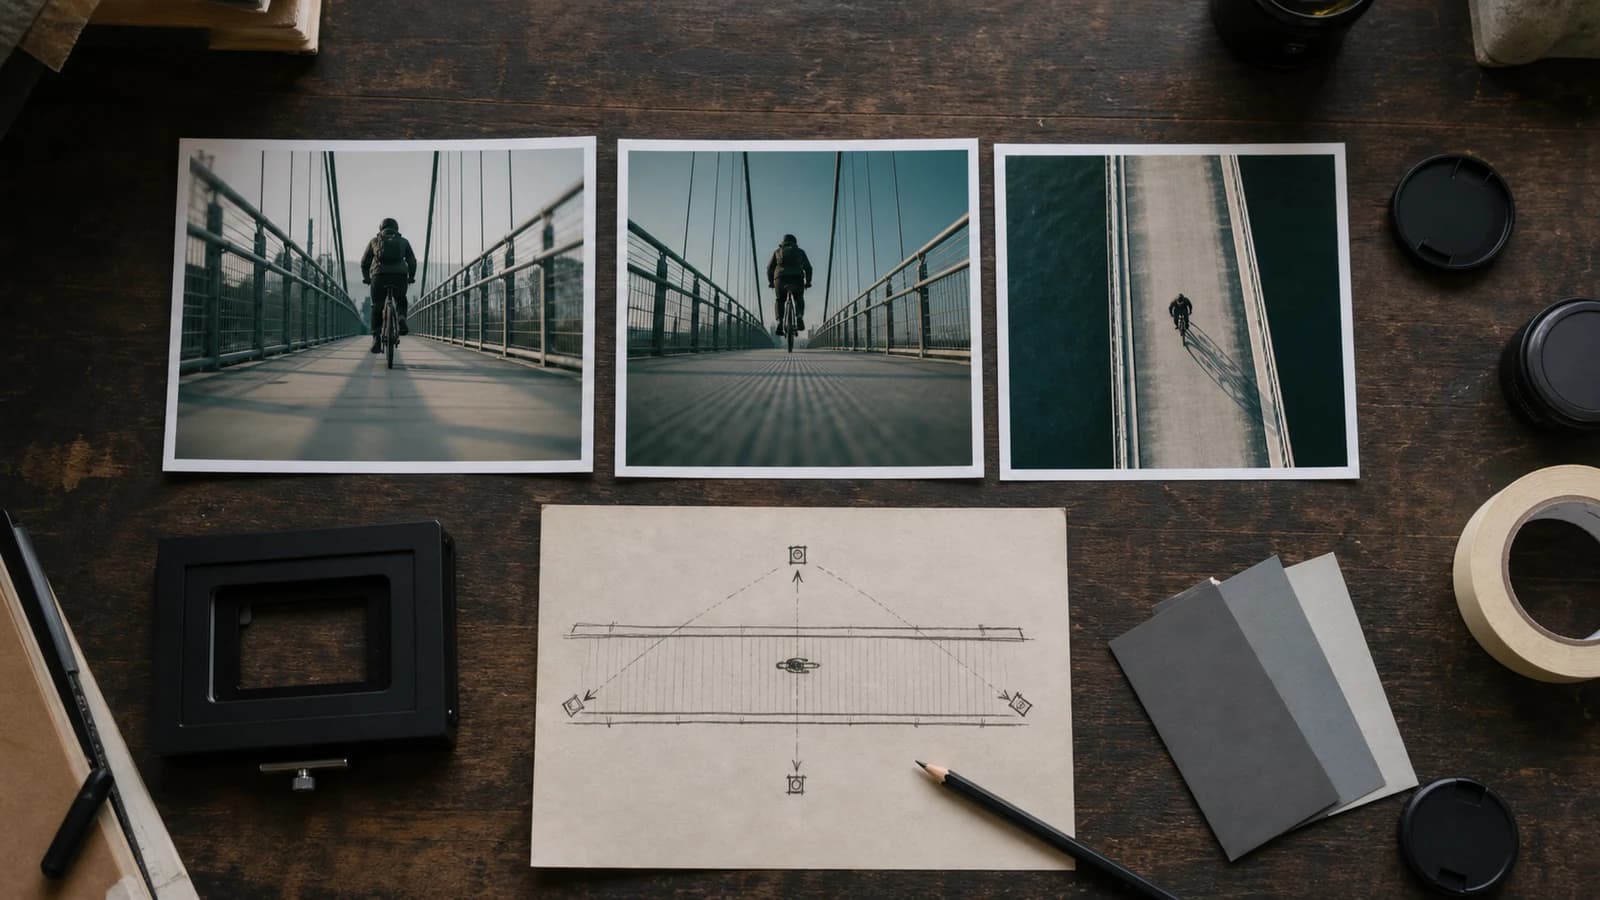
Overhead cinematography desk with three angle studies of a cyclist, a blocking sketch, viewfinder, gray cards, pencil, and lens caps

01

Name position before mood

Write where the camera is in relation to the subject: eye level, knee height, above and behind, directly overhead, or front three-quarter. Then specify where it points and how much of the subject is visible. “More cinematic” does not define a viewpoint; “camera near floor height, looking up, full body with space above the head” does.

02

Repeat only the anchors that matter

Restate a small set of visible facts from the reference—hair shape, jacket color, one prop, one location landmark, and time of day. An angle change exposes different surfaces, so exact pose and composition should not be treated as locked. Compare recognizability instead of demanding impossible pixel identity.

03

Judge perspective with straight evidence

Use railings, floor tiles, door frames, horizons, wheels, furniture, and shadows as evidence. Check whether parallel scene lines converge coherently, whether feet meet the ground, whether the horizon agrees with camera height, and whether the requested foreground enlargement supports the shot rather than becoming accidental distortion.

Six steps from reference to angle review

01

Choose one viewpoint question

Decide whether you are testing height, direction, shot size, subject distance, or frame position. Avoid changing all five in the first request.

02

Prepare and upload the reference

Use one authorized JPG, PNG, or WebP with a readable subject, clear landmarks, and enough margin to understand the original spatial relationships.

03

Write the camera brief

State camera height, direction, tilt, shot size, subject placement, visible anchors, background geometry, and one main light condition.

04

Generate one reinterpretation

Submit the reference-image task and wait for one square flattened result. Treat it as a visual proposal, not a measured reconstruction.

05

Compare angle and continuity

Check subject identity, pose logic, props, horizon, vanishing cues, overlaps, ground contact, crop, light, and which surfaces should now be visible.

06

Revise one cause at a time

Keep successful wording, change the weakest instruction, regenerate, and record the source, prompt, output, selection, and manual corrections.

Camera-angle prompts with review criteria

Three camera-angle studies of the same original courier and bicycle on a rainy pedestrian bridge
Eye-level, low-angle, and overhead studies change hierarchy and visible geometry while retaining a recognizable subject and palette.

One courier, three different readings

“Use the uploaded bridge scene. Create a low-angle full-body three-quarter reinterpretation from near deck height. Keep the orange rain jacket, teal bicycle, black bag, wet bridge, lamps, and blue-hour color relationship recognizable. Put the near wheel in the foreground, preserve believable ground contact and coherent rail convergence, no text.”

What to inspect: A low viewpoint should reveal more underside and sky, enlarge near objects, lower the apparent horizon, and change the overlaps between body, bicycle, rails, and lamps. Reject a result that merely stretches the original image or adds dramatic lighting without changing spatial evidence.

Cinematography planning desk comparing eye-level, low-angle, and overhead cyclist frames with a blocking sketch
A simple blocking plan helps separate camera placement from styling and makes comparisons easier to document.

A field guide to viewpoint, perspective, and continuity

Open the section for the decision you are making: define the angle, prepare the reference, structure the prompt, choose viewpoint, inspect perspective, protect composition, run comparisons, or complete the production review.

Separate camera angle from shot size and subject direction

Camera angle describes where the viewpoint sits and where it points relative to the subject. Shot size describes how much of the subject fills the frame. Subject direction describes which surfaces face the camera. These variables interact, but they are not interchangeable. “Low-angle close-up from the subject’s front-right side” contains a height relationship, a crop, and a horizontal direction. “Cinematic portrait” contains none of them. Begin each request with the physical relationship you want to test, then add the emotional intention as a reason for that choice rather than as a substitute for it.

Use ordinary spatial language before numeric language. Eye level means the viewpoint is roughly aligned with the subject’s eyes or the story’s normal observer. A low angle places it below the important subject plane and looks upward. A high angle places it above and looks downward. Overhead or top-down moves close to a vertical look at the ground plane. Front, side, rear, and three-quarter indicate horizontal direction. Numbers such as “45 degrees” can help communicate intent, but this page cannot measure or guarantee them because it is generating a new raster image rather than rotating a calibrated scene camera.

Review the reinterpretation, not an imaginary camera move

This is not deterministic 3D camera control

The provider generates a new image from the reference and prompt. There is no hidden scene mesh, calibrated camera, depth map, orbit control, or guarantee that a specified degree value will be measured exactly.

Identity and pose can drift

Faces, hair, hands, clothing seams, props, proportions, and expressions may change. Repeat a few visible anchors and compare carefully, but do not promise exact character or pose preservation.

Composition cannot remain exact after viewpoint change

A real viewpoint change reveals new surfaces and hides others. Subject scale, overlaps, horizon, crop, and negative space must change. The workflow cannot lock the old composition while also moving the camera through space.

Lens terms are descriptive, not calibrated settings

Words such as wide-angle, 35 mm, or telephoto may influence the visual result, but this page does not expose sensor size, focal length, distortion coefficients, focus distance, aperture, or lens metadata.

Questions about anime camera angle control

What is anime camera angle control?

It is a reference-guided generation workflow for testing a different viewpoint of an existing anime image or illustration. You upload one JPG, PNG, or WebP, describe the target angle and visible anchors, and receive one new 1024 × 1024 flattened raster reinterpretation.

How do I change the camera angle of an anime image?

Sign in, upload an authorized reference, then state camera height, direction, tilt, shot size, subject placement, identity anchors, and environmental geometry. Generate once, compare the result with the source, and change only the weakest part of the brief for the next attempt.

Can it rotate the camera to an exact number of degrees?

No exact rotation is guaranteed. Terms such as front three-quarter, side view, 45-degree high angle, or nearly overhead are useful visual directions, but the page is not operating a calibrated 3D camera or returning measured camera metadata.

Will the same anime character remain identical?

Continue the visual planning workflow

Create an original anime character referenceTurn an authorized photo into anime artPlan a sequence with an AI storyboard generatorCreate a new anime image from text

Test a new angle without overstating what the model preserved

Start from one readable image, request one viewpoint change, compare landmarks and subject anchors, then rebuild or redraw any production-critical geometry.

Generate the new angle

Editorial comparison: the same original scene idea reads differently at eye level, near the bridge deck, and from overhead. These are angle studies, not proof that an edit can rotate a fixed 3D scene or preserve every pixel.

Plan the angle before generating

“Use the uploaded cyclist frame as the only reference. Reinterpret from high above and slightly behind. Keep the cyclist and bridge recognizable, show the travel path and long shadow, preserve a simple teal-and-charcoal palette, and avoid adding signage or crowds.”

What to inspect: The planning desk makes the useful distinction: an angle request needs a camera position and subject relationship, while the reference provides appearance and scene clues. A top-down blocking sketch can expose ambiguity before another credit is used.

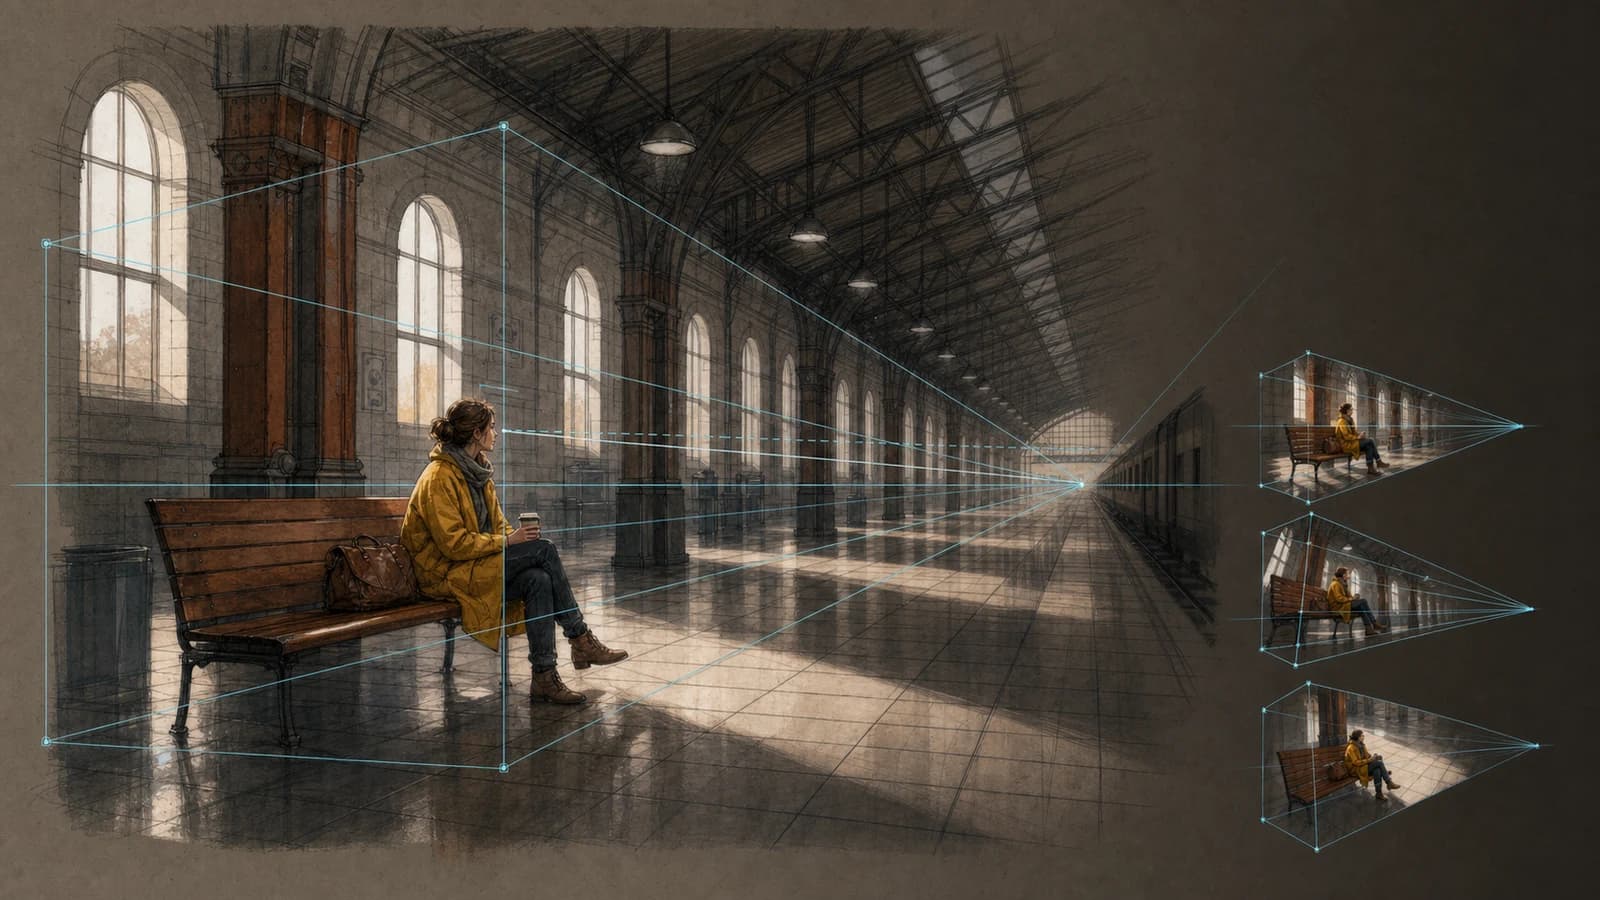
Wordless station perspective study with a seated traveler, converging architectural lines, sightline guides, and three small viewpoint variations
Perspective guides reveal whether camera height, vanishing direction, and subject placement agree; they do not turn a generated image into a measured 3D scene.

Audit vanishing cues and eyelines

“Reinterpret the uploaded station scene from eye height near the end of the bench, looking along the concourse. Keep the yellow coat, bench, bag, platform edge, windows, and roof rhythm recognizable. Use coherent one-point perspective, natural eye line, unobstructed face, and controlled morning light. No writing or station logos.”

What to inspect: Floor seams, roof beams, window spacing, bench edges, eye line, and ground contact provide specific evidence. Exact focal length cannot be recovered or enforced by this page, so judge whether the perspective is plausible and useful for the intended drawing or storyboard.

Write one sentence explaining the information the angle should reveal. A low view might make the bicycle wheel dominate the foreground and expose the underside of a bridge rail. A high view might clarify the path, shadow, and relation between the courier and an exit. An overhead view might turn furniture and walking routes into a readable pattern. If the angle has no informational job, a visually dramatic result can still be useless. The primary keyword on this page is anime camera angle control, but “control” here means directing and reviewing a generated interpretation, not commanding deterministic scene geometry.

Choose a source image with enough spatial evidence

A reference can only show the surfaces visible from its original viewpoint. If a portrait crops at the shoulders, it does not contain reliable information about footwear, floor contact, furniture behind the body, or the back of a costume. A request for a full overhead scene therefore requires the model to invent missing information. That may be acceptable during visual exploration, but it should be stated in the review. For a more controlled test, choose an image that includes the complete subject, a ground plane, at least two landmarks, and enough margin around the action to infer the original layout.

Use one JPG, PNG, or WebP that you created, licensed, or have permission to transform. Check its orientation, crop, compression, and readability before upload. Remove unrelated UI, borders, signatures, captions, and private information. If the source is tall or wide, remember that the current result is 1024 × 1024. Decide which content may be cropped or recomposed. Do not assume the square output will extend the canvas in a predictable direction, and do not upload several images expecting automatic multi-reference alignment; this page exposes one required reference for the task.

Write a short source inventory before the prompt: subject, hair shape, dominant garment, signature accessory, main prop, action, two location landmarks, horizon cue, and key light direction. Mark which facts must remain recognizable and which may change because of the new view. The top of a hat, bicycle rack, table surface, or shoulder will naturally become more visible from above; a face or chest emblem may become less visible. This inventory turns continuity into a review checklist and prevents the impossible demand that every old surface remain visible after the camera moves.

Write the new viewpoint as a compact camera brief

A practical order is: requested camera position, direction and tilt, shot size, subject action, stable visual anchors, foreground and background geometry, light, and exclusions. For example: “Camera near knee height, front-left three-quarter view, tilted slightly upward, full body. The courier steadies the teal bicycle. Keep the orange jacket, short black hair, messenger bag, wet bridge, and warm lamps recognizable. Put one wheel in the near foreground and let bridge rails converge into depth. Blue-hour ambient light. No text or new people.” Each clause has a separate review target.

Avoid mutually exclusive instructions. “Exact original composition from a completely different angle” conflicts because viewpoint changes alter occlusion, scale, horizon, and negative space. “Exact same pose, but now viewed from directly overhead” may conflict when the original pose hides the top surfaces or cannot be read from above. Replace exactness with priority: preserve the action, recognizable silhouette, jacket palette, bicycle, and destination; allow hand placement and visible garment planes to adapt. This is more honest and gives the model a hierarchy instead of a contradiction.

Use lens words cautiously. Google Cloud’s official image prompt guide demonstrates proximity, aerial and low positions, lighting, motion blur, wide-angle and lens-like descriptors as prompt modifiers. Adobe’s official guidance also treats framing and camera angle as visible prompt decisions. These words can steer appearance, but they do not become calibrated controls on this page. If the real goal is “more foreground enlargement and stronger convergence,” write that visual effect. A bare “14 mm lens” can be interpreted loosely and does not certify a physical focal length, sensor, distortion model, or camera distance.

Use eye-level, low, high, and overhead views for different evidence

Eye-level views are useful when the audience should meet the subject on relatively neutral terms and when facial relationships matter. They do not have to be flat. A front three-quarter eye-level view can reveal face, torso, and one side plane while preserving a familiar horizon. Keep the camera height tied to the focal subject: eye level for a seated child differs from standing-adult eye level. In a group scene, decide whose eye line controls the shot. If the model lifts the horizon while keeping a normal face view, the result may combine incompatible viewpoints.

Low-angle views reveal undersides, increase the visual weight of near objects, and can reduce the amount of ground visible. They are useful for height, obstruction, momentum, or a character entering a larger structure. Do not equate low angle automatically with heroism. A low camera behind furniture can create vulnerability or surveillance instead. State camera height, upward tilt, foreground object, and desired headroom. Check feet, wheels, stair edges, and vertical convergence carefully; dramatic framing often hides structural errors near the bottom of the image.

High-angle views expose ground layout, top surfaces, paths, and relative distance. Overhead views push this toward a map-like organization, but they also reduce facial information and demand invented top surfaces when the reference lacks them. Use a high view when blocking or isolation matters and an almost vertical overhead view when floor pattern and spatial arrangement are the subject. Name the important landmarks and shadow direction. Ask for a readable ground plane rather than assuming “bird’s-eye” will preserve the character, building, and prop relationships automatically.

Read camera distance, field of view, horizon, and convergence separately

Perspective is visible in relative size, overlap, and the way depth is projected. Nikon’s lens material states that perspective is determined by camera-to-subject distance, while its current focal-length guide explains that focal length controls angle of view and magnification. In practice, photographers often change distance when changing lenses to keep a subject similarly framed, which changes the near-to-far size relationship. For a generated edit, describe the result you need—close camera with an enlarged foreground wheel, or more distant camera with compressed-looking spatial layers—instead of treating a millimeter value as a guarantee.

Blender’s official camera manual provides a useful geometric reference: in perspective projection, distant objects appear smaller and parallel lines seem to converge; longer focal lengths show a narrower field of view, while shorter focal lengths include more of the scene. Orthographic projection keeps parallel lines parallel and removes ordinary distance scaling. Anime art can stylize these systems, but it still needs internal logic. If rails converge toward one region while floor seams converge elsewhere without a deliberate multi-point setup, or if a rear object grows larger, the result needs correction.

Find the horizon through eye-level evidence rather than sky color. In a level view of flat ground, sets of horizontal parallel lines converge at vanishing points on the horizon. Raising the camera raises that eye-level relationship within the scene; tilting down reveals more ground but also affects verticals and frame geometry. This tool does not expose camera shift, sensor fit, or projection mode. Use architecture and props to judge plausibility, then rebuild critical layouts in a 3D package or perspective drawing system when a measured camera is required.

Protect the story after the angle changes the frame

A camera-angle edit succeeds only if the new frame still communicates the intended action. First trace the focal path: where does the eye land, what is discovered next, and which landmark explains the location? A low angle may enlarge a foreground prop until it blocks the face. A high angle may make the subject too small to read. Use subject placement, value contrast, light, and negative space to restore hierarchy. Do not ask the model to preserve old framing mechanically; decide how the new angle should redistribute attention.

Check eyelines in relation to objects, not only the frame. If a character looks toward a door, the new viewpoint should keep that door in a plausible direction or deliberately move it off-screen. If two characters face each other, their eyes should meet across compatible screen positions. Reference-guided generation can reverse a prop or gaze. Name the important relation—“the courier looks down and right toward the bicycle lock”—then inspect head rotation, pupils, target location, and body orientation. A convincing face looking at nothing is a continuity failure.

Reserve margins for the real destination. The current result is square, while the final use may be a vertical poster, horizontal storyboard, profile card, or mobile crop. State where critical action and future type must remain, but add real text after export. Blender’s camera documentation discusses safe areas as a way to keep important action and graphics away from vulnerable edges; the exact delivery standard varies, yet the principle applies. Test the selected image in the intended crop rather than assuming a centered square will survive every format.

Change one variable and keep an angle test log

Compare source and result in two passes. The angle pass asks whether camera height, direction, visible surfaces, horizon, convergence, foreground scale, and crop changed in the requested way. The continuity pass asks whether face, hair, clothing, action, prop, setting, light, and story relationship remain usable. Separating them avoids accepting a failed angle because the character looks attractive, or rejecting a useful viewpoint because a repairable accessory changed. Record both judgments with concrete nouns.

If the result barely changes, simplify the prompt and move the camera instruction to the first sentence. Remove style changes, extra atmosphere, new action, and multiple lens terms. If the result changes too much, shorten the list of required anchors to the few that identify the subject, use a less extreme angle, and request a closer shot that needs less invented environment. If anatomy or ground contact breaks, use a simpler pose, clearer source, and less obstructed view. If geometry conflicts, name straight landmarks and reduce decorative clutter.

Keep a version log with source filename, upload date, prompt, requested variable, generated result, what matched, what drifted, and the next single change. There is no exposed seed or batch comparison on this page, so the log is the continuity mechanism. Save selected outputs rather than assuming they remain available forever. For a production shot, rebuild the accepted angle in editable 3D, drawing, or compositing software and use the generated image as a visual reference, not as proof of exact spatial reconstruction.

Finish the angle study with records a collaborator can trust

Before release, inspect faces, hands, feet, wheels, furniture, architecture, shadows, accidental signatures, logo-like marks, and text-like artifacts at full size. Confirm that the uploaded reference is your work or that its license and permissions allow this transformation. A new angle does not erase rights in the source character, photograph, costume, location, or brand. Keep the source, permission record, prompt, generated result, selection reason, manual edits, and final export together so another collaborator can understand what was transformed.

For U.S. context, the U.S. Copyright Office’s AI initiative and 2025 copyrightability report explain that human-authored expressive elements, selection, arrangement, and modification can matter, while prompting alone does not automatically establish authorship. Other countries and contracts differ. Do not treat this page as a rights-clearance service. Check provider and plan terms, disclose AI assistance where the context or platform requires it, and seek qualified advice when a commercial release, real person, or valuable property creates material risk.

Write alternative text for what the published image communicates. W3C WAI advises short contextual descriptions for informative images, function-focused text for images used as controls, and empty alt for decoration. A useful comparison alt might say, “The same courier and bicycle shown at eye level, from deck height, and from overhead on a rainy bridge.” A complex perspective study may also need a visible explanation nearby. Sources consulted for this guide: Google Cloud image prompt guide (https://docs.cloud.google.com/vertex-ai/generative-ai/docs/image/img-gen-prompt-guide), Adobe composition reference guidance (https://helpx.adobe.com/firefly/web/work-with-images/generate-images/match-image-composition-to-reference-image.html), Nikon focal-length guidance (https://www.nikonusa.com/learn-and-explore/c/tips-and-techniques/understanding-focal-length), Blender camera manual (https://docs.blender.org/manual/en/latest/render/cameras.html), and W3C images tutorial (https://www.w3.org/WAI/tutorials/images/).

The result is one flattened square raster image

There are no layers, separate subjects, masks, vectors, automatic multi-view sheets, seed values, batch jobs, or video tracks. Finish critical art in a drawing, compositing, or 3D application.

The reference route can be unavailable

The task requires sign-in, a public upload URL, and working APIMart reference-image configuration. An unsupported file, failed upload, missing configuration, insufficient credit, timeout, or provider error can stop the task.

A plausible image can still be spatially wrong

Surface polish can hide an inconsistent horizon, broken wheel, sliding foot, reversed prop, impossible staircase, or mismatched shadow. Review structure before accepting style.

No. The reference can help retain recognizable features, but the new viewpoint is generated rather than rendered from a fixed character model. Face, hair, outfit details, body proportions, hands, pose, and props can drift and require manual correction.

Which camera angle should I request?

Use eye level for a neutral relationship, low angle to emphasize height or foreground scale, high angle to reveal layout or reduce dominance, overhead for map-like organization, and three-quarter views to show both front and side planes. Choose according to the story information you need.

Can I keep the exact pose and composition?

Not exactly. Moving the viewpoint changes which surfaces are visible, how forms overlap, where the horizon sits, and how much space each object occupies. Restate the action and important landmarks, then judge whether the new geometry still serves the scene.

Does it support JPG, PNG, and WebP?

Yes, those are the supported reference formats in the current upload interface. Use one clear image with the subject and spatial landmarks visible. The result is a square raster reinterpretation rather than a file in the source dimensions.

Can it produce several camera views automatically?

No automatic multi-view or batch workflow is exposed. The page returns one image per task. Submit separate controlled requests for additional angles and maintain your own comparison sheet, prompt log, and continuity review.

Why does the new angle look distorted?

The reference may not show enough depth, the requested angle may conflict with the original pose, or the prompt may mix height, lens, crop, and action changes. Simplify to one viewpoint, keep clear landmarks, and inspect horizon, convergence, anatomy, overlaps, and ground contact.

Can I use the generated angle commercially?

Commercial use depends on your rights in the uploaded image, the active provider and plan terms, your contribution and editing, and applicable law. Use authorized sources, inspect resemblance and accidental marks, keep records, and seek professional advice for consequential releases.