Anime Maker logoAnime Maker
  • Home
  • AI Anime Generator
  • Features
  • Cases
  • Pricing
  • Blog
Anime Maker logoAnime Maker

Create anime images, original characters, photo-based illustrations, and short videos from focused prompts.

Email
Product
  • Features
  • Pricing
  • FAQ
  • AI Anime Generator
  • Photo to Anime AI
  • Image to Video Anime AI
  • Anime Character Generator
  • Anime Logo Maker
Company
  • About
  • Contact
Legal
  • Cookie Policy
  • Privacy Policy
  • Terms of Service
© 2026 Anime Maker All Rights Reserved.

Webtoon background generator

Webtoon Background Generator for Scene Concepts

Describe one location, one camera purpose, and the open space your characters and speech bubbles need. Generate a square background concept, inspect its perspective and recurring landmarks, then turn the useful direction into a production asset in your drawing or 3D software.

Generate one background with a clear job in the scene

The working tool is in the first viewport. Describe the location, horizon, vanishing-point logic, foreground and distance layers, character standing zone, speech-bubble space, time of day, and the landmarks that identify the set. The result stays on this page as one square raster image.

Generation mode
Output format
One image
1024 × 1024
Flattened raster concept

Example outputs

What one focused input can produce

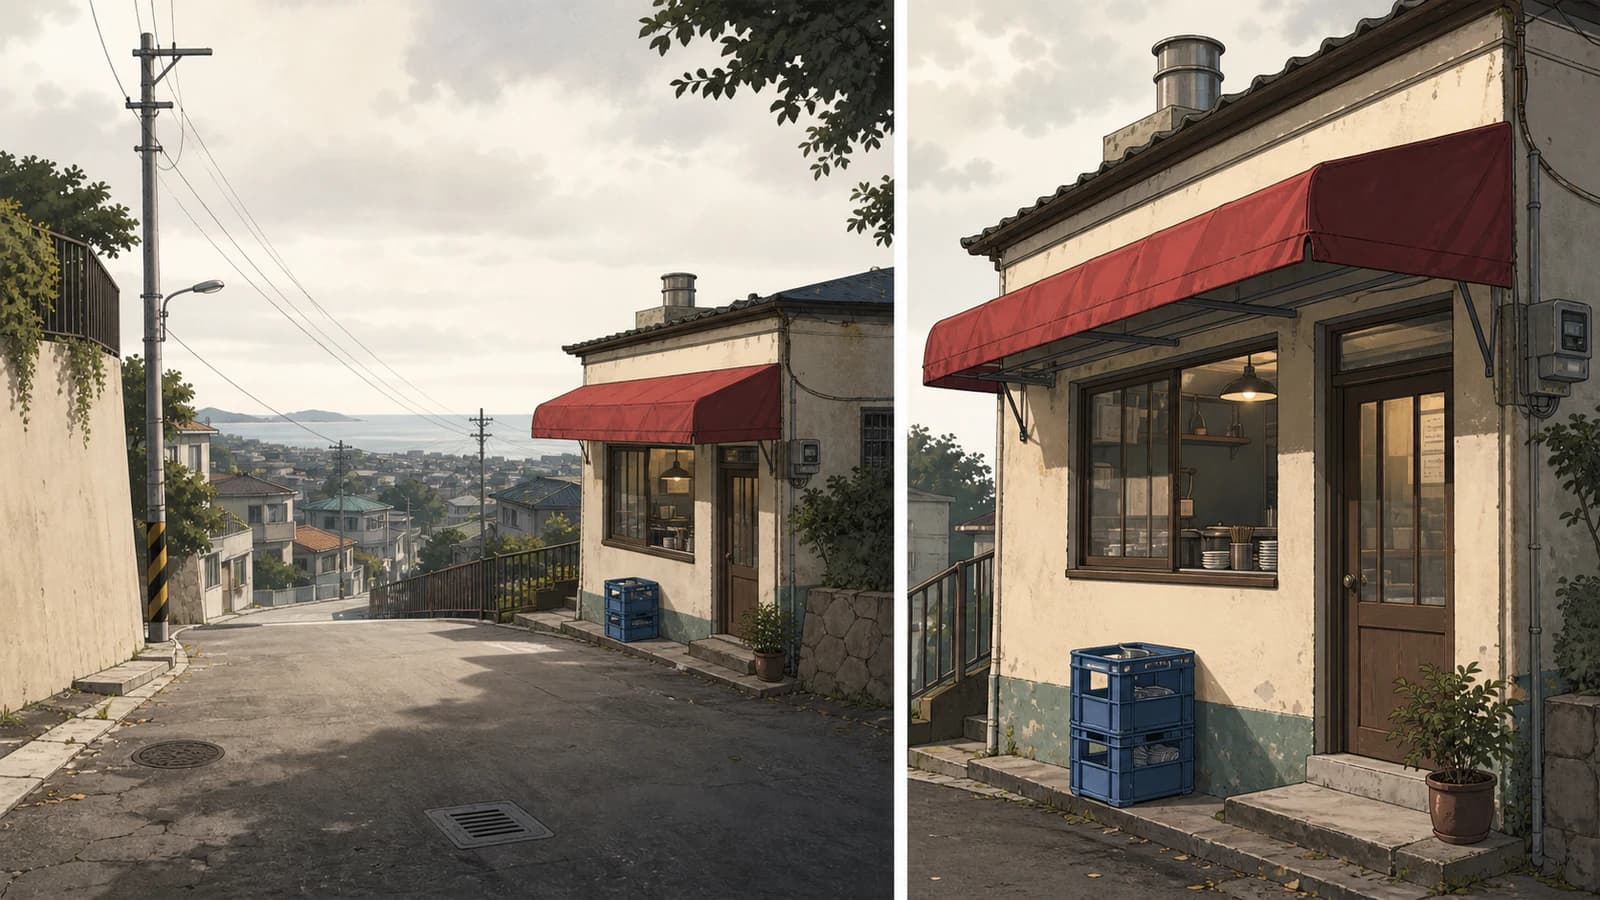
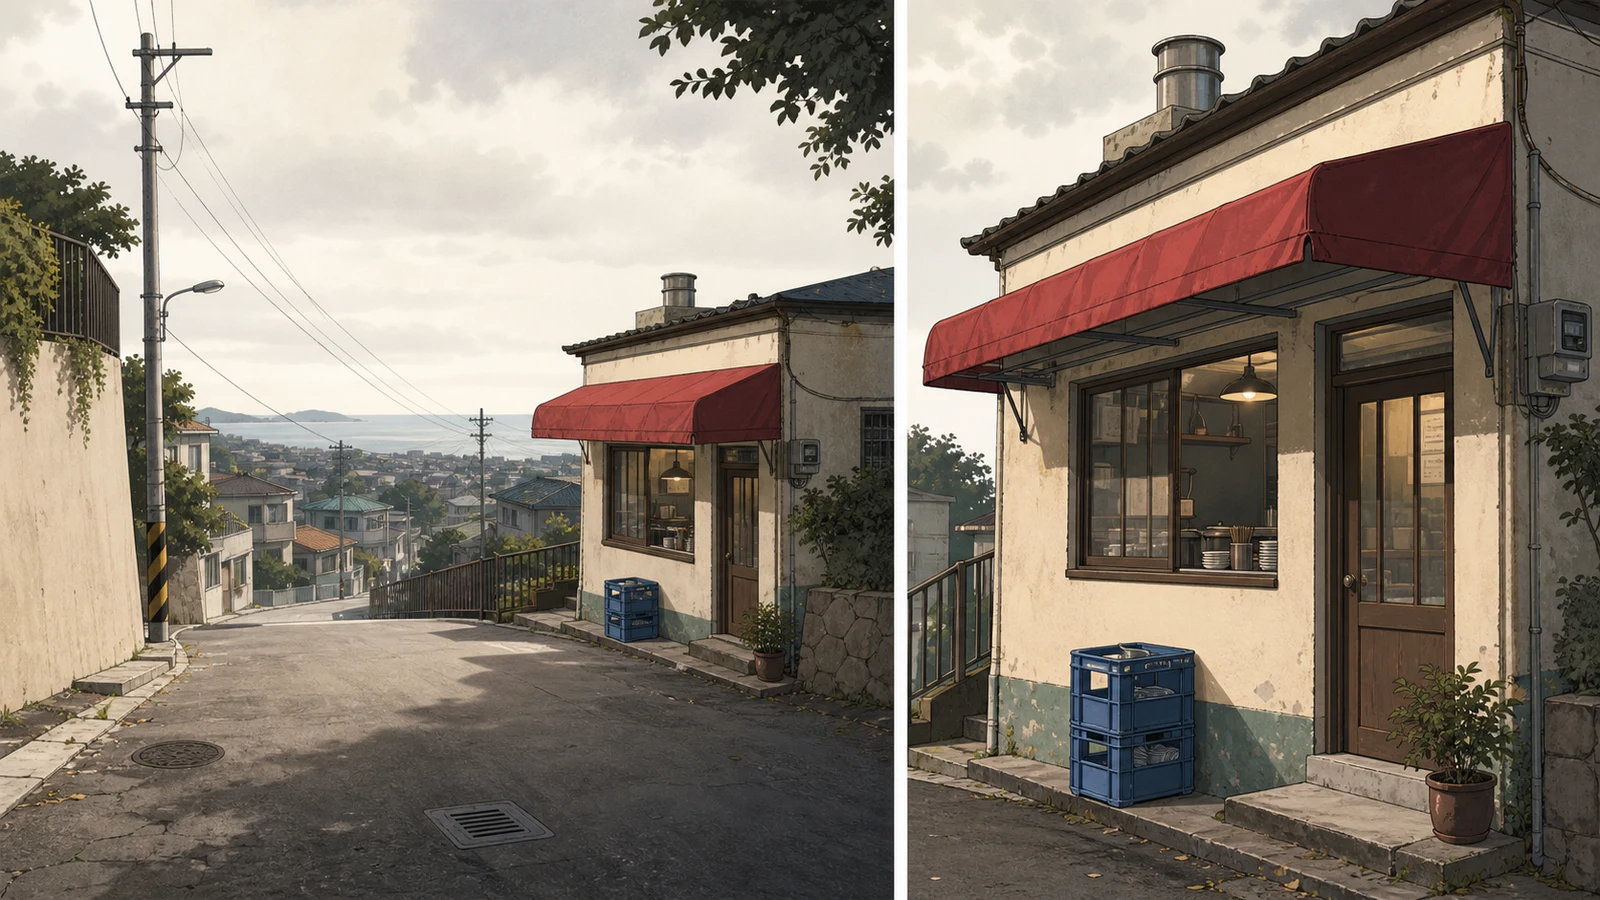
Two original views of the same hillside noodle shop, preserving its red awning, blue crate, utility pole, doorway, street depth, and open staging space

Standard image

Advanced image

Actual output

one 1024 × 1024 flattened raster background concept

Best used for

environment ideation, establishing-shot direction, location color keys, lighting variants, pitch art, and references for a manual 2D or 3D rebuild

Not designed for

complete vertical episodes, editable layers, reusable 3D sets, deterministic camera rotation, exact perspective correction, reliable signs, batch output, or automatic continuity

Product and guidance reviewed 2026-07-22

Capability copy was checked against the current text-to-image panel, webtoon-background prompt rule, 1024 × 1024 raster result path, and the absence of reference upload, layer, batch, camera, and episode-assembly controls.

Plan the empty stage before placing the castFive steps from shot need to reusable background assetWebtoon background prompts with review criteriaBuild a repeatable webtoon location from the conceptCheck what one generated square cannot solve for youQuestions about the webtoon background generator

Plan the empty stage before placing the cast

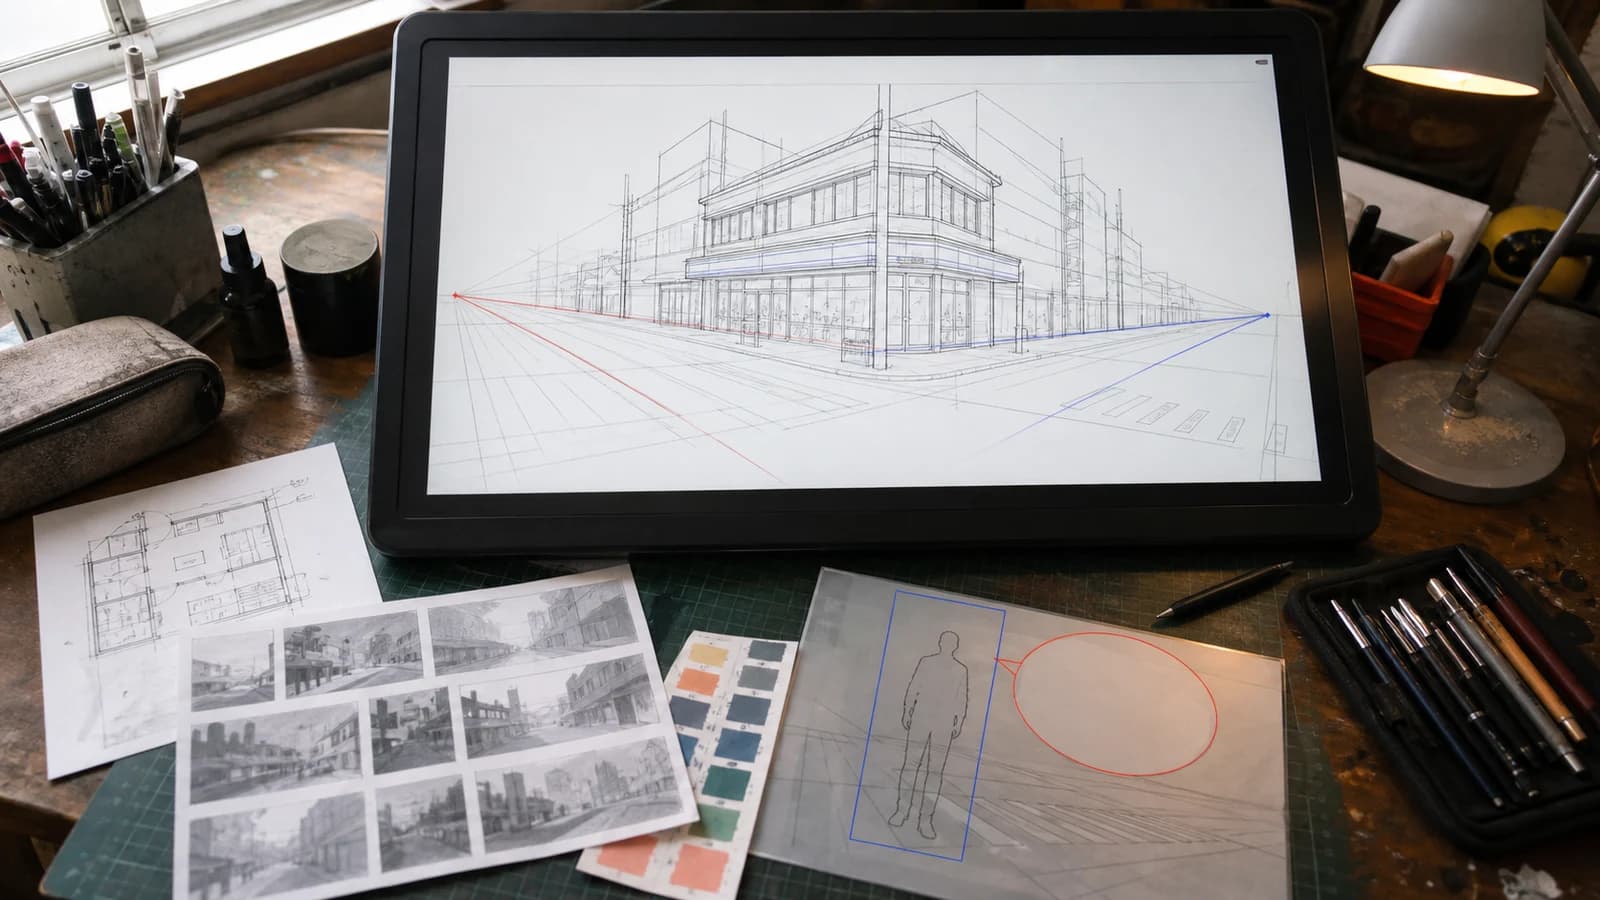
A useful webtoon background is not simply a detailed room or street. It establishes where the reader is, supports the emotional beat, leaves believable floor space for bodies, and protects calm areas where lettering can remain legible on a phone.

Illustrator workspace with a two-point-perspective street drawing, floor-plan sketch, value thumbnails, palette swatches, character standing zone, and speech-bubble space

01

Name the shot purpose before the architecture

Decide whether the background must establish geography, support a conversation, hide a reveal, create isolation, or provide a path for action. The same café needs a different composition for a first arrival, a two-person confession, and a chase through the rear exit. One prompt should solve one of those jobs.

02

Reserve the places people and words will occupy

Ask for a believable standing or movement zone rather than filling every surface with props. Protect calm value areas near likely dialogue positions. Negative space is not unfinished art; it is working room for characters, balloons, captions, and the reader’s eye.

03

Repeat a short landmark list

Give a recurring set four to six durable anchors such as awning shape, door color, window count, stair direction, distinctive prop, and distant silhouette. Reuse the exact list in later prompts, then compare manually. Repetition helps recognition but does not lock geometry.

Five steps from shot need to reusable background asset

01

Write the shot job

State what the reader must learn or feel, which direction a character will face or move, and where dialogue is likely to sit.

02

Set horizon and depth

Choose eye level and one-, two-, or three-point logic; name foreground, midground, and background landmarks that make the space readable.

03

Generate one concept

Request one empty environment with clear staging zones, stable location anchors, controlled values, and no text or branded details.

04

Audit geometry and continuity

Trace horizon and converging lines, test a character silhouette on the ground plane, and compare doors, windows, props, scale, and light with your location sheet.

05

Rebuild and export

Redraw in layered 2D or construct a simple 3D set, save approved camera references, add cast and lettering, then export to the current platform specification.

Webtoon background prompts with review criteria

Wide and close environment views of an original noodle shop on a coastal hillside street
A recurring location becomes easier to recognize when a few structural and color anchors survive changes in shot distance.

A hillside shop with two useful camera distances

“Original noodle shop on a sloping coastal street, wide exterior establishing view, standing eye height, two-point perspective, red blank awning, blue delivery crate, wooden door, left utility pole, three potted plants, distant sea, open staging near door, quiet sky and wall for balloons, no people or text.”

What to inspect: The prompt connects story use, eye level, perspective, depth, character space, lettering space, lighting, and a short set of landmarks. Review whether the road supports a standing figure, the storefront scale is credible, and the same anchors can be redrawn at closer distance.

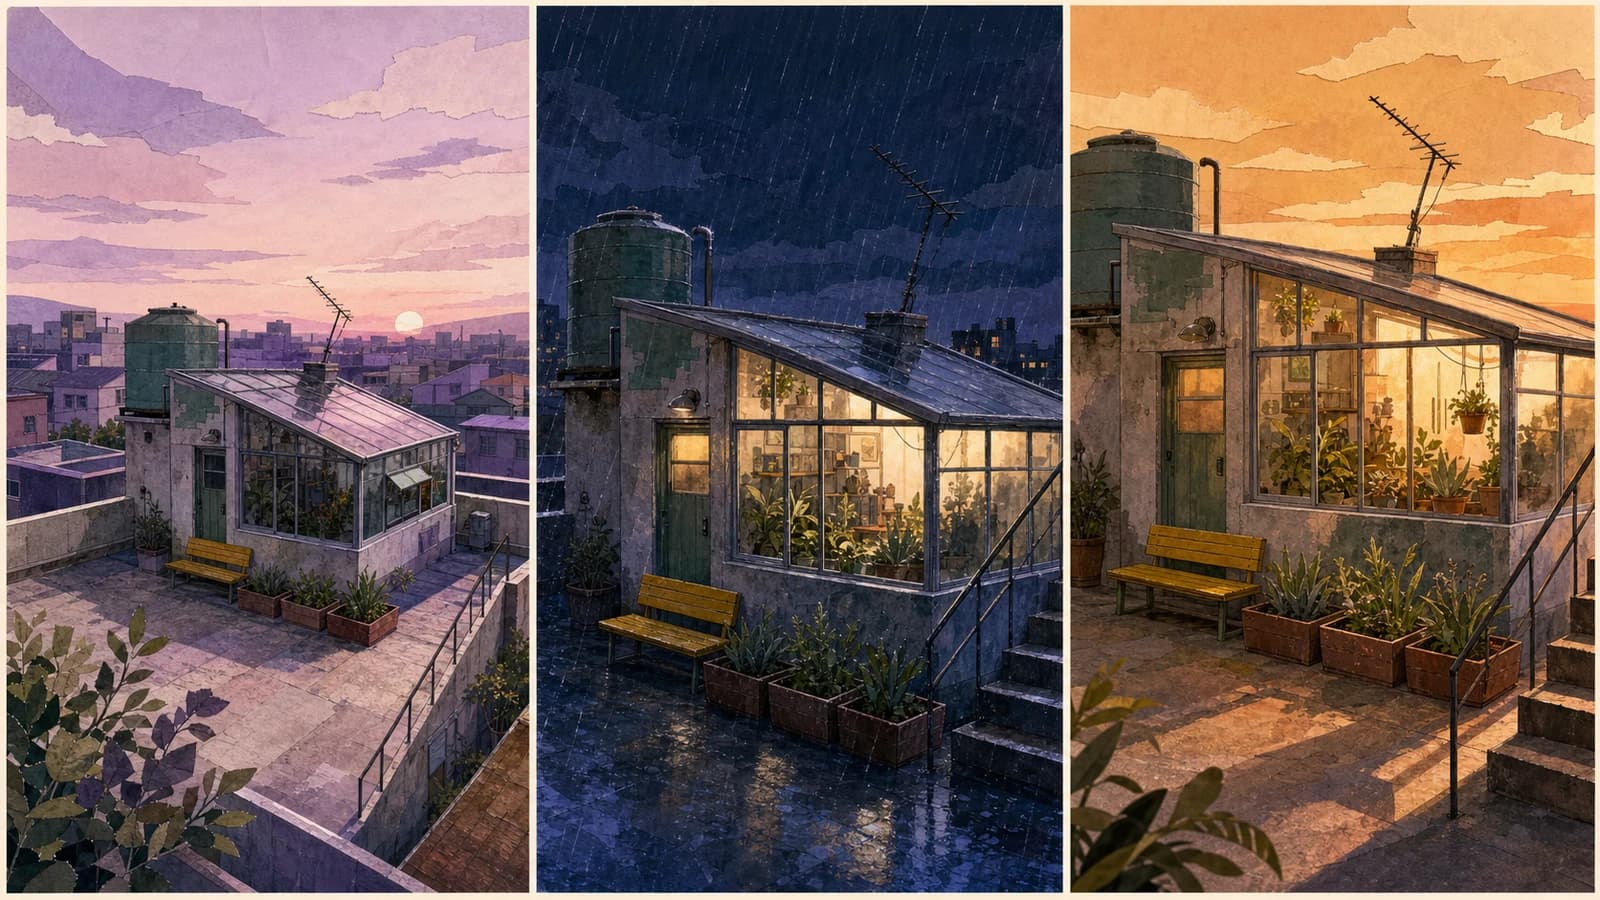
Three views of the same original rooftop greenhouse at dawn, rainy night, and amber sunset with recurring landmarks preserved
Continuity review separates durable location identity from weather, light, and camera variation.

Build a repeatable webtoon location from the concept

Open the section that matches your current production decision: shot purpose, perspective, staging, recurring-location continuity, 2D or 3D rebuild, lighting, export, accessibility, or rights.

Design the location for the story beat, not for a portfolio view

Start with the information the background must deliver. An establishing view needs enough geography to connect entrances, paths, height changes, and nearby landmarks. A dialogue background needs stable eyelines, seated or standing room, calm values behind heads, and likely reverse-angle coverage. An action location needs a readable route, obstacles that can influence movement, and a safe landing or contact plane. If the prompt says only “beautiful detailed alley,” the model can spend its effort on surface decoration while leaving no usable place for the scene.

Write a one-sentence shot job before naming style: “Show that the clinic sits above the market and has only one public stair,” or “Hold two characters apart in a cramped kitchen while leaving the back door visible.” That sentence becomes the acceptance test. A visually attractive result fails if it hides the only exit, places the floor at an impossible height, or fills the exact area required for the cast. Background design is information design: detail matters only after the reader understands location and action.

Check what one generated square cannot solve for you

One square, flattened concept

The current page returns one 1024 × 1024 raster image. It does not output a tall episode strip, separate depth planes, transparent overlays, vectors, layered PSD files, or a native Krita, Photoshop, Clip Studio, or Blender project.

No 3D set or rotatable camera

The image can suggest depth, but there is no scene geometry behind it. You cannot orbit the camera, change a lens, relight the set, or render a matching reverse angle. Rebuild useful architecture in drawing or 3D software when repeatability matters.

Perspective needs human checking

Parallel edges may converge inconsistently, stairs may change rise, furniture can float, and doors can be too small. The page has no automatic perspective-correction control. Trace the horizon and vanishing directions yourself before placing characters.

Recurring locations can drift

A repeated prompt does not preserve exact dimensions or object positions. Windows, doors, props, colors, weather, and neighborhood geography may change between requests. Maintain a real plan, elevation, landmark list, and approved views.

Questions about the webtoon background generator

What does the webtoon background generator create?

It creates one 1024 × 1024 flattened raster environment concept from a text prompt. Use it to explore location, perspective direction, lighting, depth, and staging. It does not return a complete vertical episode, layers, a 3D scene, or matching camera angles.

How do I write a useful webtoon background prompt?

Name the shot purpose, location, eye level, perspective logic, foreground-to-distance layers, character standing or movement zone, speech-bubble space, light, and four to six recurring landmarks. Ask for no people, writing, logos, brands, or watermark when you need a clean plate.

Can it make a complete vertical-scroll episode?

No. The output is one square concept. Plan panel rhythm, spacing, cast, dialogue, transitions, and final vertical assembly in your comic-production software. Crop or redraw only after you know the destination size and current publishing requirements.

Continue the webtoon production workflow

Plan the scene as a storyboard firstBuild a black-and-white manga panelCreate a full-color manhwa keyframeDevelop a comic page concept

Generate the location direction, then build the usable asset

Start with one camera purpose and a short landmark list. Keep the strongest concept, repair its geometry, and store the finished location with your real episode files and continuity notes.

Generate a background concept

Representative location study: the wide view establishes geography while the closer view tests whether the red awning, blue crate, doorway, utility pole, and sloping street remain identifiable. The actual tool returns one square concept per generation, not this paired production sheet.

One rooftop greenhouse across time and angle

“Original rooftop greenhouse used as a recurring webtoon setting. Preserve sloped glass roof, round water tank at back left, yellow bench, three planters, diagonal stair rail, and bent antenna. Create a readable empty environment with a clear ground plane and quiet sky, no writing or characters.”

What to inspect: The dawn, rainy-night, and sunset studies reveal which facts define the location and which belong only to lighting. A real episode still needs an approved plan, elevation, palette key, and camera reference because a new generation may move or resize every object.

A dialogue-ready café rather than an empty beauty shot

“Original small café interior for a two-person conversation, medium-wide seated eye level, one window, service counter, two empty chairs, clear floor between chairs, calm wall behind each seat, oval pendant, green tile strip, blue vase, cool rain outside and warm practical light, no people, menus, words, or logos.”

What to inspect: The composition is judged by whether two figures, their eyelines, and balloons can be added without hiding the location. Decorative detail is secondary to floor contact, headroom, value separation, and useful reverse-angle planning.

For vertical reading, also ask what the preceding and following panels already establish. A second wide view may be redundant if the episode just showed the exterior; a close environmental insert of a wet umbrella, open locker, or broken elevator button may carry the transition better. The generator produces one square image, so it cannot plan scroll timing for you. Keep a real episode outline and request only the environment view needed for the current beat.

Set the horizon and vanishing logic before adding detail

The horizon represents the viewer’s eye level in ordinary linear perspective. A low horizon can make buildings loom and reveal less of the ground; a high horizon can expose circulation and make floor staging easier to judge. One-point perspective suits a corridor or view facing a flat wall, two-point perspective suits a corner or street seen obliquely, and three-point perspective adds vertical convergence for strong high or low angles. State the intended logic, but treat generated construction as a proposal rather than verified geometry.

Audit the result by tracing long edges that should be parallel in the scene: curbs, rooflines, shelves, window heads, floor joints, and table edges. Related sets should converge toward compatible regions. Repeated objects should shrink consistently with distance, verticals should follow the intended camera tilt, and stair rises should not suddenly change. Krita’s official Assistant Tool documentation describes vanishing-point and two-point assistants that can be saved, reloaded, limited to an area, and used for snapping. Rebuild critical lines with those tools instead of painting over a structural error and hoping it disappears.

When repeatability matters, a simple 3D blockout can be more economical than redrawing every angle. Blender’s official camera documentation distinguishes perspective cameras, where distant objects appear smaller and parallel rails converge, from orthographic cameras, where size does not diminish with distance. It also documents focal length, field of view, camera shift, and background images. Those are real scene controls in Blender; the generated raster on this page has none of them. Use the concept as design reference, then choose measured 2D construction or a 3D set based on how often the location returns.

Protect character footing, movement paths, and bubble space

Place a rough character silhouette over the background before approving it. The feet should meet a believable ground plane, body scale should fit doors and furniture, and the head should not collide with a high-contrast edge. For action, draw the movement path and check where the pose begins, peaks, and lands. A floor covered by foreground props can look rich but prevent readable blocking. Ask for an open staging zone in the prompt, then verify it rather than trusting the phrase.

Speech bubbles need space, contrast, and a clear relationship to the speaker. Reserve calm walls, sky, ceiling, windows with controlled values, or intentionally simplified shelves near likely head positions. Do not place every important landmark in those same areas. Bubble space does not need to be white; it needs predictable value and enough room for the language, font size, and translation expansion used in production. Add final balloons outside the generator so wording, tails, reading order, and accessibility remain editable.

Check the image at phone width. Background edges that look subtle on a large monitor can cut through a face or compete with text when reduced. Use value grouping: foreground, acting plane, and distance should remain separable without every object receiving maximum contrast. A useful background can be quieter than a standalone illustration because characters, effects, balloons, and scroll spacing will complete the panel later.

Build continuity from plans and landmarks, not prompt memory

Create a location bible for any place that appears more than once. Include a simple overhead plan, one or more elevations, room and door relationships, stair direction, window count, important dimensions, palette, material notes, fixed props, movable props, daylight direction, practical lights, and approved views. Four to six memorable anchors are enough for prompt repetition, but the production document should contain more precise information than the prompt.

Separate identity from state. A sloped glass roof, round tank, yellow bench, three planters, diagonal rail, and bent antenna may define the rooftop greenhouse. Dawn, rain, holiday decorations, an open door, or a broken pane are states that can change during the story. Record when each state begins and ends. The continuity illustration on this page demonstrates the review principle, but the generator itself does not produce synchronized day, night, and angle variants in one task.

Version approved camera views and connect them to episode and panel IDs. If a later generation moves the tank or reverses the stair, do not silently accept the new geography because the lighting is attractive. Either redraw it to the location bible, update the bible through an intentional story decision, or reject it. Continuity is editorial ownership, not a property that can be delegated to a repeated sentence.

Choose a 2D redraw, photo-composite, or 3D rebuild deliberately

A one-off bedroom insert may need only a corrected 2D paint-over. A café used in forty episodes may justify a simple 3D shell with camera presets. A street assembled from licensed photography may need perspective matching, paint-over, and privacy or property review. Choose based on recurrence, angle variety, required precision, team skill, deadline, and rights—not on the assumption that one method is always more professional.

For a layered 2D rebuild, separate at least line or structure, local color, shadow, light, atmospheric depth, movable props, and foreground occluders. Keep characters and balloons separate. For a 3D rebuild, model only the geometry that affects silhouette, parallax, contact, and camera placement; simple materials and a paint-over can carry style. The generated result offers design direction but no editable depth information, object masks, measurements, or reliable hidden surfaces.

If a generated architectural plane is close but distorted, correct it in a real editor. Adobe’s official Perspective Warp guidance explains how users define connected or separate planes and manipulate them while preserving selected areas. That is a manual Photoshop feature, not a capability on this page. Correcting one concept does not create a rotatable set; save the corrected view as a camera reference or use it to guide the real reconstruction.

Keep location identity readable through day, night, and weather

Start with local colors and value groups before atmosphere. Record the wall, roof, floor, door, large furniture, and signature prop colors in neutral light. Then define what the story state changes: warm interior practicals at night, cool skylight after rain, a long sunset shadow, or emergency light during a blackout. Without a neutral key, every new lighting variant can quietly redesign the location.

Light should explain volume and support the beat. Name the key source, fill environment, shadow family, reflective surfaces, and one focal contrast. “Cinematic lighting” is not enough to reproduce. A window can cast a directional key; wet pavement can carry broken reflections; fog can reduce distant contrast. Keep faces and balloons in mind even though they are absent from the plate. A highlight exactly behind a future face may make the finished panel harder to read.

Describe materials through visible behavior. Matte plaster has broad value shifts and soft broken texture; glazed tile creates compact highlights; brushed metal reflects directionally; glass reveals and reflects at once. Do not ask for every surface to be highly detailed. Save the strongest texture and contrast for landmarks or narrative evidence, and simplify surfaces that will sit behind dialogue or recurring characters.

Assemble the episode to the destination specification

Keep a layered master at a practical working resolution and export derivatives for the current destination. Do not stretch the generated 1024 × 1024 square into a tall strip. Crop, extend, redraw, or rebuild it according to the panel, then assemble panels and scroll spacing in your comic application. Inspect the final export at actual phone width, not only as a large desktop canvas. Thin lines, dark stair edges, and background signs can fail after resizing or compression.

Platform assets have different requirements, and those requirements can change. WEBTOON CANVAS’s official 2026 thumbnail guide, for example, distinguishes 1080 × 1080 square series thumbnails, 1080 × 1920 vertical series thumbnails, and a recommended 202 × 142 episode thumbnail with separate file-size rules. Those numbers describe thumbnails, not proof that a generated square is an episode file. Check the current creator dashboard and official help for episode upload limits before every delivery.

Use a preflight checklist: correct dimensions, accepted format, color appearance, file size, no accidental transparent seams, no unreadable generated marks, and no important content lost in crop. Store the source, edited master, export preset, final upload file, and a contact sheet. Naming files by series, episode, scene, location, shot, lighting state, and version makes future corrections much safer than “background-final-2.”

Publish an understandable, authorized environment

Backgrounds carry story information: where the scene occurs, whether an exit is blocked, what clue sits on a table, or how a neighborhood changes. If an exported image is published on a web page outside a comic reader, provide text alternatives that convey its purpose. W3C’s Web Accessibility Initiative distinguishes informative images, which need an equivalent short description, from decorative images, which should use an empty alt value. For a comic, also provide an accessible transcript or scene description that captures important environmental information not present in dialogue.

Do not depend on text baked into the generated background. Add real lettering later so spelling, language, contrast, reading order, and localization can be reviewed. Avoid using color alone to distinguish doors, routes, warnings, or clues; shape, position, value, and dialogue can reinforce the information. Test dark scenes for shadow detail and keep balloons readable without covering the only environmental evidence the reader needs.

Use original prompts and locations or material you are authorized to adapt. Remove logos and accidental pseudo-branding, avoid protected characters and named living artists, and consider privacy when a real home or private workplace can be identified. Keep the concept, references, permissions, prompt, generation, redraw, 3D work, paint-over, and final assembly as a rights and authorship record. Commercial clearance depends on provider terms, contracts, and local law; consequential releases may require professional legal advice.

Signs and lettering are unreliable

Generated signs may contain broken letter-like marks, incorrect language, or accidental branding. Request blank signboards and add verified lettering later with licensed type, correct perspective, and sufficient contrast.

No batch or episode continuity engine

The interface generates one concept per task. It does not produce a location pack, synchronize day and night variants, build every panel in an episode, or remember approval decisions. Version and assemble all episode assets elsewhere.

A plausible scene may still be unsafe to publish

Check accidental resemblance, protected architecture or artwork, logos, private locations, and reference rights. Commercial use also depends on the active provider and plan terms, your edits, contracts, and the law where the work is released.

Can I rotate the camera around the generated background?

No. A raster image has no hidden 3D geometry. To create dependable new angles, rebuild the location as a simple 3D set or use a measured 2D plan, perspective guides, elevations, and approved camera drawings.

How do I keep a recurring webtoon location consistent?

Keep a location bible with a plan, major dimensions, palette, material notes, landmark list, day and night keys, and approved views. Reuse the same prompt anchors, but compare every new result because generation does not lock exact geometry.

Does the tool fix perspective automatically?

No dedicated perspective-correction control is exposed. Check the horizon, vanishing directions, scale, repeated spacing, stairs, door height, and ground contact manually. Redraw critical geometry with perspective assistants or a simple 3D blockout.

Can it generate readable shop signs?

Generated lettering is not dependable. Ask for blank boards, remove text-like artifacts, and add final signs later in an editor. Verify spelling, language, font rights, perspective, contrast, and whether the sign is legible at phone size.

What should I do after downloading the background?

Compare the concept with the shot brief, trace its perspective, test character scale and bubble placement, then rebuild the approved structure in layered 2D or 3D. Add characters and lettering, check accessibility, and export to the latest platform specification.

Can I use the generated background commercially?

Commercial use depends on your prompt and source rights, the active provider and plan terms, your human contribution, contracts, and applicable law. Avoid protected characters, branded locations, unlicensed references, and named living artists; retain your brief and edit record.