
2026/07/21
How to Keep AI Characters Consistent: A Practical Guide
Keep AI characters recognizable with a character bible, repeatable prompts, reference frames, one-change revisions, and a shot-by-shot QA checklist.
Keeping an AI character consistent is less about finding one perfect prompt and more about running a controlled production process. Define the character once, save the details that must not change, work from an approved reference frame when the tool supports one, and revise one variable at a time. Then judge every new image against the same continuity checklist.
This guide is for comic creators, indie animators, visual-novel teams, social-media storytellers, and anyone producing the same original character in more than one image. It covers what you can control, what remains probabilistic, and how to build a small workflow that catches drift before it spreads through a chapter or sequence.
Quick answer: Create a compact character bible, generate and approve a neutral reference image, reuse one locked prompt block, change only the scene-specific block, and run a face–hair–costume–palette–prop check after every generation. No prompt can guarantee an identical character across independent requests, so plan for selection and correction.
What “consistent” should mean in a real project
Perfect pixel identity is rarely the useful target. A comic character can change expression, angle, lighting, and pose while remaining clearly recognizable. Before generating anything, decide which features are identity anchors and which are allowed to move.
| Layer | Usually locked | Usually allowed to change |
|---|---|---|
| Face | face shape, eye color, brow shape, distinguishing mark | expression, gaze, head angle |
| Hair | cut, fringe, base color, signature strand | wind, wetness, temporary styling |
| Costume | silhouette, key colors, emblem, main materials | folds, damage, weather layers |
| Body | approximate age, build, height relationship | pose, foreshortening, action |
| Props | signature object, which hand carries it | position, open/closed state |
| Rendering | line weight, shading family, palette logic | time of day, shot contrast |
For a single portrait, three or four anchors may be enough. For a 20-panel scene, record at least five: face, hair, costume, palette, and one distinctive detail. If two characters share a panel, give each a separate anchor list and write their screen positions explicitly.
Build a one-page character bible before prompting
A character bible is a production reference, not a biography. It should let another artist identify a wrong output in seconds. Keep story lore elsewhere; this page is for visible facts and continuity rules.
Record these fields:
- Identity sentence: role, apparent age, build, and overall impression.
- Face: shape, eye color and shape, eyebrows, nose, freckles, scars, or moles.
- Hair: length, cut, fringe, color, texture, and one signature feature.
- Costume: silhouette, layers, materials, exact color relationships, footwear, and accessories.
- Palette: three to five named colors. Hex values are useful for downstream editing, even if a generator does not reproduce them exactly.
- Scale: height relative to another recurring character or a common prop.
- Do-not-change list: the three details that most often drift.
- Allowed variations: expressions, poses, weather states, or alternate outfits that are approved.
Avoid descriptions such as “beautiful cyberpunk heroine.” They express taste but do not define identity. “Young adult courier, compact athletic build, amber downturned eyes, blunt black bob ending at the jaw, one cyan hair clip above the left temple, cropped charcoal jacket with a yellow diagonal strap” gives the system and the reviewer observable facts.
If you are still exploring the design, use the anime character generator to create one focused square concept at a time. The current tool creates a 1024 × 1024 raster image from text and does not lock a character identity between requests. Treat the best result as a design candidate, not as a trained character model.
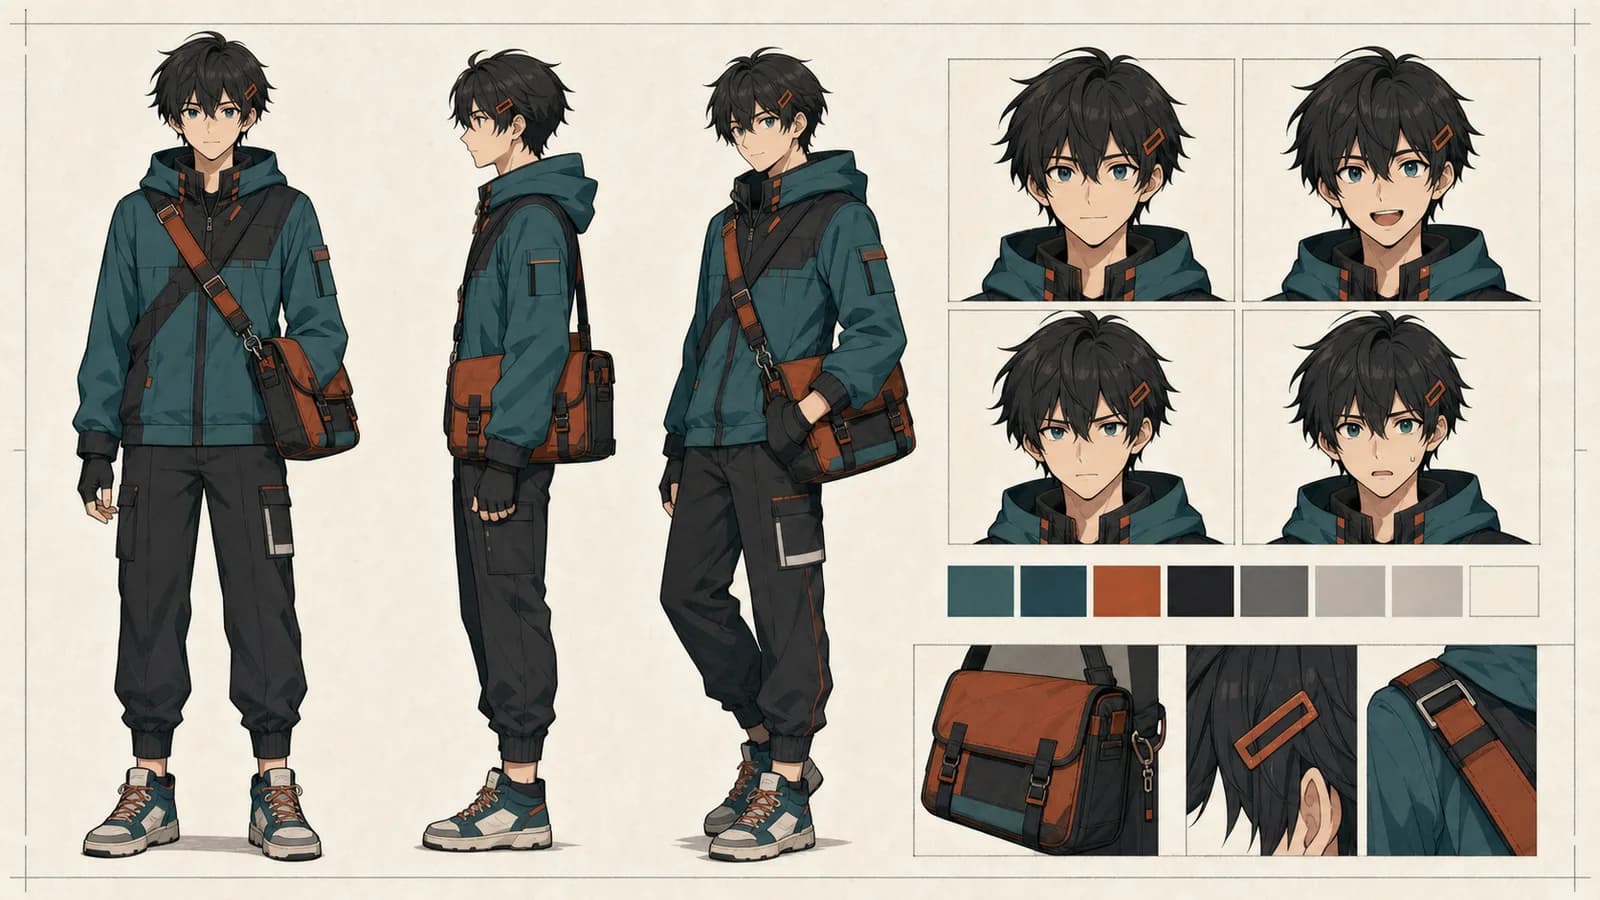
Make a reference sheet that answers production questions
An attractive hero portrait is not automatically a good reference. A useful reference image shows the details most likely to drift. Start with a clean background and even lighting so color and silhouette are easy to read.
Your first reference sheet can contain:
- a neutral front or three-quarter view;
- one profile or back view if the hairstyle or costume changes there;
- three expressions: neutral, joy, and tension;
- the full costume from head to footwear;
- a close view of the signature accessory;
- short written notes outside the image for exact colors and left/right placement.
Do not rely on tiny text rendered inside an AI image. Save the visual, then add labels in a design editor. Also keep a plain-text copy of the approved character description. If the lettering is unreadable or the reference image is lost, your production rules should still be recoverable.
When your starting point is a photo, the photo-to-anime tool can use a JPG, PNG, or WebP reference to guide a new 1024 × 1024 interpretation. It does not copy the source pixel for pixel, and recognizable details can still change. Upload only a photo you created or have permission to use.
Reference controls differ between products. Adobe’s official Firefly documentation, for example, separates composition reference from style controls. That distinction is useful even when your tool has simpler inputs: decide whether a reference is meant to preserve identity, pose, layout, or rendering style rather than expecting one image to solve all four.
Use a prompt with locked and variable blocks
Do not rewrite the entire prompt for every panel. Separate it into four blocks so the identity text remains stable and scene direction can change safely.
Block A: locked character identity
Write this once and paste it without synonyms. If the approved phrase says “jaw-length blunt black bob,” do not switch to “short dark hair” in the next shot.
ORIGINAL CHARACTER — MIRA:
young adult courier, compact athletic build; oval face; amber downturned eyes;
jaw-length blunt black bob; one cyan rectangular hair clip above LEFT temple;
cropped charcoal jacket; yellow diagonal chest strap; dark cargo trousers;
small silver compass worn at the throat.
LOCK: amber eyes, black bob, left-side cyan clip, yellow strap, silver compass.
Block B: scene and action
Describe one story beat: where the character is, what she is doing, and what emotion the viewer should read. One frame should not contain several moments separated by “then.”
SCENE: empty elevated train platform just after rain.
ACTION: Mira stops beside the open carriage door and looks back over her right shoulder.
EXPRESSION: alert, controlled breathing, not smiling.
Block C: camera and composition
Specify shot size, viewpoint, screen direction, and important negative space.
CAMERA: medium three-quarter shot from waist height, 50 mm visual feel.
COMPOSITION: Mira on the right third; open carriage door on the left;
clear space above the platform for a later caption; compass remains visible.
“50 mm visual feel” is an art-direction shortcut, not a promise of a physically simulated lens. The practical goal is to keep framing language stable across the sequence.
Block D: rendering and exclusions
State the visual treatment and the failures that would make the frame unusable.
RENDERING: original anime illustration, clean controlled linework,
muted blue night palette with warm carriage light, simple cel shading.
AVOID: extra accessories, changed eye color, hair covering the cyan clip,
logos, captions, watermark, duplicated character, unreadable text.
Keep a version number beside every approved prompt: MIRA_CORE_v03, PLATFORM_SCENE_v02, SHOT_04_v05. The label matters more than the naming format. Without versions, a team cannot tell which phrase produced the accepted frame.
OpenAI’s image creation guidance recommends grounding a prompt in purpose, subject, action, location, and style, then making step-by-step revisions while keeping the rest unchanged. That is the same discipline this block system is designed to enforce.
Generate a continuity ladder, not a whole chapter
Test the character in increasing difficulty before committing to production.
- Neutral portrait: clear face, simple light, no action.
- Expression change: same framing, one new emotion.
- Angle change: profile or back three-quarter view.
- Full-body pose: verify costume silhouette and scale.
- Environment: add the recurring location.
- Second character: test separation of traits.
- Action frame: movement, occlusion, or strong foreshortening.
If the design fails at step 3, generating 30 action panels only creates 30 correction jobs. Fix the prompt or reference set at the earliest failing rung. Keep two to four successful samples as an approval pack; a large folder of mixed-quality generations makes the intended design less clear.
For sequential storytelling, draft the beat and panel order before adding visual detail. The AI manga generator is best used for compact black-and-white page or panel concepts, while the AI comic generator supports square comic-page drafts. Both create one raster image at a time; neither locks a character model across pages or produces editable lettering. Plan dialogue, but add final speech bubbles and type after the art is stable.
Change one variable per revision
When a frame is close, identify the largest mismatch and change only the instruction responsible for it. If the face, costume, camera, and lighting all change at once, you cannot tell which edit helped.
Use a revision log like this:
| Version | One requested change | Result | Decision |
|---|---|---|---|
| v01 | baseline prompt | correct face; missing compass | reject |
| v02 | “silver compass visible at throat” | compass restored; pose stable | keep |
| v03 | “left hand on door frame” | extra fingers; face stable | reject |
| v04 | simplify hand to silhouette | usable hand and compass | approve |
The instruction “keep everything else unchanged” can help in tools with editing or conversational context, but it is not a mathematical lock. An independent generation may reinterpret the whole frame. Save every approved result locally; do not assume a generation history is a permanent archive.
Run continuity QA after every shot
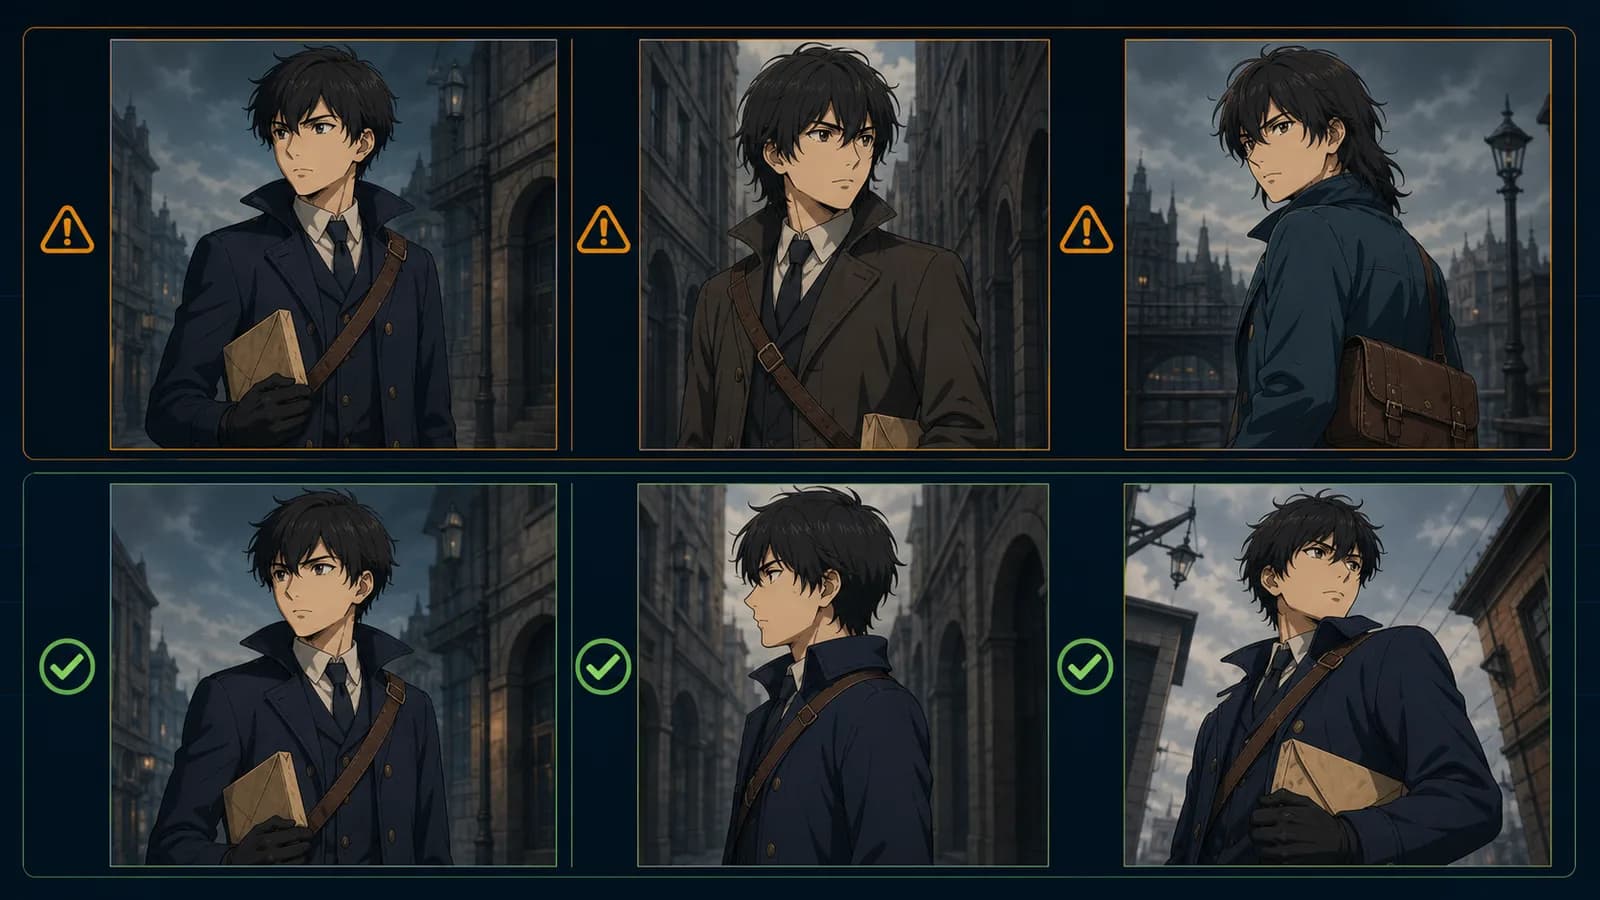
Review at full size and as a thumbnail. The thumbnail catches silhouette and palette drift; full size catches eyes, accessories, hands, and costume seams.
Use this ten-point check:
- face shape and apparent age match the reference;
- eye color and eye shape are correct;
- hair cut, color, fringe, and signature strand match;
- left/right details are not mirrored;
- costume layers, emblem, and key colors are present;
- body scale is believable beside recurring characters and props;
- signature prop is not duplicated, missing, or moved to the wrong hand;
- lighting changes the scene without recoloring the identity anchors;
- no extra fingers, limbs, accessories, text, logos, or watermarks appear;
- the shot still communicates the intended story beat.
Give every approved image an ID such as EP01_SC03_SH04_v04_APPROVED. Record its prompt version, source reference, crop, and any manual fixes. A spreadsheet with one row per shot is enough for a short project.
A simple continuity score
For fast reviews, score five categories from 0 to 2:
- face;
- hair;
- costume;
- palette;
- signature prop.
A total of 10/10 means all five anchors are usable. 8–9 may be repairable in an editor. 7 or below usually deserves regeneration unless the shot is tiny or deliberately obscured. This is a team rubric, not a scientific model benchmark; adjust the threshold to the visibility and importance of the shot.
Plan for multiple characters and costume changes
Crowded scenes increase attribute swapping. Introduce characters by name, position, and action in separate sentences. Avoid a single long adjective chain.
LEFT — MIRA: [locked identity block]. She holds the compass in her right hand.
RIGHT — JON: tall, broad-shouldered mechanic, shaved head, green coveralls.
Jon points toward the carriage. Mira looks at Jon. Keep their clothing colors separate.
For an alternate outfit, create a new approved state rather than quietly changing the core description. Name it MIRA_RAIN_v01 or MIRA_GALA_v01, make a reference frame, and record which scenes use it. The same rule applies to injuries, time skips, and magical transformations.
Protect rights and private reference material
A technically consistent character can still be unusable if the source material was not authorized. Use an original character, licensed material, or a reference you have permission to transform. Permission to view an image online is not the same as permission to upload and reuse it. Get explicit consent before using another person’s likeness, especially for commercial or sensitive contexts.
The U.S. Copyright Office’s 2025 report on AI-generated material explains that copyrightability depends on human-authored expression and is assessed case by case; prompts alone do not automatically settle authorship. Laws differ by country, so treat this as a production warning, not legal advice. Keep evidence of your own sketches, writing, selections, compositing, retouching, and layout decisions.
Anime Maker’s Privacy Policy states that generation information can include prompts, uploaded reference files, settings, generated-file locations, task status, errors, and credit usage. It does not promise one fixed retention period for every record. Do not upload confidential client concepts, identification documents, intimate images, a child’s personal data, or any material you are not authorized to send to an AI service. For a sensitive project, use redacted references or a local workflow approved by the client.
A repeatable workflow for a 12-panel scene
Here is a realistic sequence for a small comic scene:
- Write the scene as 12 beats before prompting.
- Approve one neutral character reference and one costume reference.
- Freeze the core identity prompt at version 1.
- Make three low-complexity test frames: close-up, profile, and full body.
- Correct the character bible where those tests expose ambiguity.
- Generate panels 1–3 and run continuity QA before continuing.
- Select one approved frame from that batch as the local scene reference.
- Generate the next batch while changing only action and camera blocks.
- Record accepted prompt versions and rejected failure patterns.
- Fix small color or accessory errors in an editor when regeneration would risk a good composition.
- Add final dialogue, sound effects, captions, and logos outside the generator.
- Export a contact sheet and inspect the full sequence for palette, scale, and left/right continuity.
This workflow is slower than generating 12 images blindly and much faster than repairing a chapter full of drifting faces.
Frequently asked questions
Can one prompt keep an AI character perfectly consistent?
No. A repeated prompt improves continuity but does not guarantee identical output across independent generations. Use a locked identity block, approved references where supported, small batches, and manual QA. Expect to select, regenerate, or edit some frames.
Should I use a character reference or a style reference?
Use a character reference to communicate identity and a style reference to communicate rendering. A composition reference communicates layout or pose. Some tools combine these controls; others do not expose them. Label each reference by its job so your team does not assume it controls everything.
How many character details belong in the core prompt?
Start with five identity anchors: face, hair, costume silhouette, palette, and one signature detail. Add only details that reviewers can see and verify. Very long biographies dilute the visible instructions and make prompt maintenance harder.
Do seeds guarantee the same character?
No. In tools that expose a seed, it controls part of the generation’s starting randomness. The same seed may help produce related outputs only when the model, prompt, settings, and implementation also remain compatible. Anime Maker’s character page does not expose a seed control, so do not put a fake seed number in the prompt and expect identity locking.
When should I edit instead of regenerate?
Edit when the composition, expression, and most identity anchors are already right and the remaining error is local: a missing hair clip, a small color shift, or a costume seam. Regenerate when the face, pose, camera, or story beat is fundamentally wrong.
Can I maintain consistency across manga pages?
Yes, but it requires production tracking. Freeze character and costume blocks, work in short scene batches, use one approval pack, label every shot and prompt version, and inspect pages together. Add final lettering after art approval so a visual correction does not destroy finished text.
The takeaway
To keep AI characters consistent, replace prompt improvisation with continuity management. Lock five visible identity anchors, approve a useful reference, separate fixed and variable prompt blocks, change one thing at a time, and review every shot against the same checklist. The generator supplies options; your character bible, selections, corrections, and sequence-level judgment turn those options into one coherent character.
Author

Categories
What “consistent” should mean in a real projectBuild a one-page character bible before promptingMake a reference sheet that answers production questionsUse a prompt with locked and variable blocksBlock A: locked character identityBlock B: scene and actionBlock C: camera and compositionBlock D: rendering and exclusionsGenerate a continuity ladder, not a whole chapterChange one variable per revisionRun continuity QA after every shotA simple continuity scorePlan for multiple characters and costume changesProtect rights and private reference materialA repeatable workflow for a 12-panel sceneFrequently asked questionsCan one prompt keep an AI character perfectly consistent?Should I use a character reference or a style reference?How many character details belong in the core prompt?Do seeds guarantee the same character?When should I edit instead of regenerate?Can I maintain consistency across manga pages?The takeaway
More Posts
Production guides
Anime Camera Angles: A Practical Storytelling Guide
Plan anime camera angles that clarify story, emotion, and screen direction. Compare shot sizes, build a shot list, and write prompts you can test.
Production guides
Comic Panel Layout Guide: Control Flow and Pacing
Use this comic panel layout guide to plan readable grids, gutters, focal panels, dialogue space, page turns, and mobile-friendly story flow for print or phone.
Production guides
Comic vs Manga vs Manhwa: A Practical Comparison
Compare comic vs manga vs manhwa by publishing tradition, reading direction, color, layout, serialization, workflow, and the format your story needs most.
Newsletter
Join the community
Subscribe to our newsletter for the latest news and updates